How to Sow Canna Seeds (Germination in 5 Days)!
Important Disclaimer: While cannas can be grown from seeds, it's crucial to understand that plants grown from seeds may not be true to the parent variety. Canna seeds are often the result of open pollination, meaning the characteristics of the resulting plant (flower color, height, leaf pattern) can vary from the plant that produced the seed.
Step 1Accelerating Canna Seed Germination in 5 Days: Steps and Materials
To germinate your Canna seeds in 5 days or less, meticulous seed and environment preparation is essential. This method, as demonstrated by J&D Gardens NJ, aims to quickly and efficiently break the natural dormancy of Canna seeds. Here's what you'll need and the first steps to get started:
Gather Your Materials
Collect the necessary tools to prepare your Canna seeds for rapid germination. Having everything at hand will save you time and ensure a smooth process.
- Canna Seeds: Ensure they are mature and viable.
- Cutting pliers or vice grips: To hold the seed firmly (according to the video, electrician's pliers are used).
- Metal file: For scarification (a square file is recommended).
- Damp paper towel: The main germination substrate (blue recommended for visibility).
- Small plastic bag: To create a humid environment (ziplock freezer bag type).
- Permanent marker: For labeling your seeds.
- Small 2¼-inch (5.7 cm) pots: For planting germinated seeds.
- Light potting mix: A substrate suitable for young seedlings.
Step 2Prepare Your Canna Seeds for Rapid Germination: The Scarification Method
Canna seeds have an extremely hard outer shell that prevents water from penetrating and initiating germination. Without intervention, this process can take months, even years, naturally. The key to accelerating germination in 5 days is a technique called scarification, which involves gently breaking this protective barrier. This method is much faster than simple soaking and allows for accelerated water absorption.
Secure the Seed
Hold a Canna seed firmly with cutting pliers or vice grips. This prevents the seed from moving during scarification.
- Ensure the seed is stable and won't slip.
- Avoid applying excessive pressure that could crush the seed.
Create a Groove with a File
Take your metal file and gently rub it on the seed to create a small groove in the outer shell. The goal is to expose the white inner part of the seed without damaging the embryo.
- Rub the file on the seed 1 to 2 times.
- Aim for a small white spot to indicate successful scarification.
- Using the corner of a square file can help create a precise groove.
Check Scarification
Visually inspect each scarified Canna seed to ensure a small white area is visible. This opening is crucial as it allows water to penetrate the seed, initiating the germination process.
- A small groove is sufficient; avoid over-filing.
- The exposed white area is the entry point for water.
Step 3The Paper Towel Method for Ultra-Fast Canna Germination
Once your Canna seeds are scarified, the next step is to place them in a humid, warm, and dark environment to promote rapid germination. The paper towel method is highly effective for observing germination progress and quickly transferring viable seeds to potting mix. J&D Gardens NJ found this to be a much faster way than simply soaking the seeds in water.
Prepare the Paper Towel
Dampen a paper towel (a blue one is recommended for better visibility of white sprouts) with water. Ensure it is moist but not soaking wet, as excess water can lead to rot.
- Wring out any excess water.
- The paper towel should be uniformly moist.
Arrange the Seeds
Place the scarified Canna seeds evenly spaced on one half of the damp paper towel. This allows each seed enough space to germinate without being overcrowded.
- Distribute seeds to avoid them touching, if possible.
- Fold the other half of the paper towel over the seeds.
Seal in a Plastic Bag
Gently place the folded paper towel with the seeds into a small plastic bag (like a ziplock freezer bag). Seal the bag to maintain a high humidity level, essential for rapid germination.
- Ensure the bag is completely sealed.
- Check daily for adequate humidity levels.
Store in a Warm, Dark Place
Place the sealed bag in a warm, dark place, such as inside a cabinet above a refrigerator. The appliance's heat can provide gentle, consistent warmth that aids germination, while darkness mimics natural underground conditions.
- Avoid direct sunlight, which can dry out the paper towel.
- Monitor daily for signs of germination.
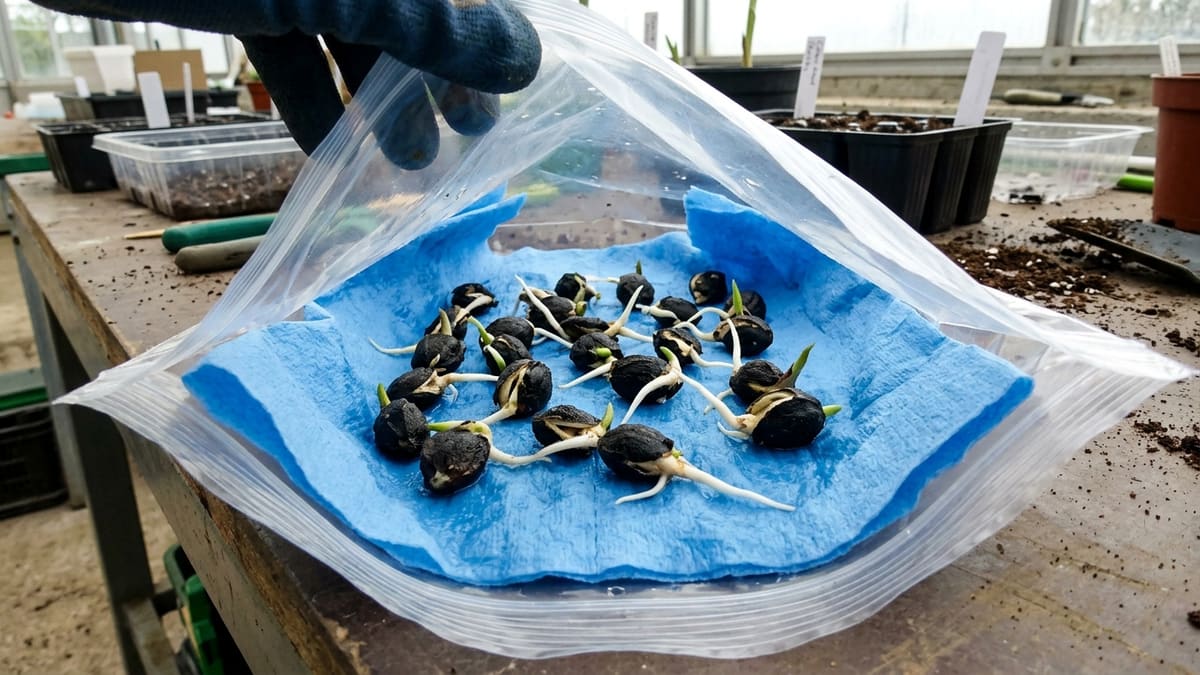
Step 4Signs of Successful Germination and When to Plant Canna Sprouts
After approximately 5 days, gently open your plastic bag and unfold the paper towel to check for germination. You should see tiny white roots emerging from the scarified Canna seeds. These are your seedlings ready to be planted!
Identify Germinated Seeds
Look for white 'outgrowths' or small roots extending from the scarified area of the Canna seed. This indicates successful germination and that the seed is ready for planting.
- Not all seeds will germinate simultaneously; continue to monitor.
- The root will typically be white or very light in color.
Prepare Your Pots
Fill 2¼-inch (5.7 cm) pots with a light, well-draining potting mix. This pot size provides ample space for initial root development before repotting.
- Avoid over-compacting the potting mix.
- Make small holes in the soil to facilitate seed placement, using a marker or your finger.
Plant Germinated Seeds
Gently take each germinated seed (using tweezers for smaller ones if you prefer) and place it in the prepared hole with the root pointing downwards. Lightly cover with potting mix.
- Be very gentle; young roots are fragile and can break easily.
- Ensure the top of the seed is barely covered or slightly exposed.
- The video shows planting 2 to 3 seeds per pot.
Water and Label
Lightly water your freshly planted Canna seeds to settle the potting mix around the roots. Immediately label each pot with the plant type (e.g., 'Canna South Pacific Orange') and date to track your planting.
- Water gently to avoid dislodging the seeds.
- Labeling is crucial for organization, especially with multiple varieties.
Step 5Post-Germination Care for Young Canna Sprouts
Once your Canna seeds are planted, proper care is essential for their continued growth into strong, healthy plants. Placing them under grow lights and maintaining consistent moisture will help them thrive in their early stages.
Provide Adequate Light
Place your planted Canna seedlings under grow lights immediately after planting. Cannas are tropical plants and require plenty of light to grow vigorously.
- Ensure lights are at an appropriate distance to avoid burning the seedlings.
- Aim for 12 to 16 hours of light per day.
Maintain Moisture
Keep the potting mix consistently moist but not waterlogged. Young seedlings are sensitive to drying out and excessive wetness, which can cause damping-off.
- Check soil moisture daily.
- Water from the bottom or use a gentle mister to avoid disturbing seedlings.
Monitor Growth and Thin
Observe your Canna seedlings for consistent growth. If you planted multiple seeds per pot, consider thinning them to allow the strongest seedlings to thrive as they grow larger.
- Cannas grow quickly in the right environment.
- Thinning prevents overcrowding and competition for resources.
Common Mistakes to Avoid to Ensure Successful Canna Germination
While the rapid Canna seed germination method is highly effective, certain pitfalls can hinder your success. Being aware of these common mistakes will help ensure a high germination rate and healthy seedlings.
Insufficient Scarification
Failing to adequately scarify the hard seed coat is the most common mistake. If the white inner layer is not exposed, water will not penetrate, and the seed will not germinate quickly.
- Ensure a visible groove is made.
- Don't be afraid to apply firm but controlled pressure.
Over-Scarification
While scarification is essential, going too far can damage the embryo, rendering the seed non-viable. A small line or white dot is sufficient.
- Avoid excessively sanding the seed.
- Gentle filing is more effective than aggressive sanding.
Inconsistent Moisture Levels
The paper towel must remain consistently moist. If it dries out, germination will stop or fail. Conversely, a soaking wet paper towel can lead to mold or rot.
- Check the plastic bag daily for condensation.
- Mist with water if the paper towel appears dry.
Delayed Planting
Once roots emerge, plant the seeds quickly. Delicate rootlets are susceptible to drying out or breaking if left too long in the paper towel.
- Prepare your pots and potting mix in advance.
- Handle germinated seeds with extreme care during transfer.
Following these steps will help you achieve rapid germination of Canna seeds, allowing you to enjoy these magnificent plants much sooner. For more general gardening tips, you can consult resources like the Royal Horticultural Society. For more advanced seed propagation techniques, explore channels like J&D Gardens NJ on YouTube, which provided the inspiration for this rapid germination method.
🏆 The Expert's Verdict: Why This Method Excels
Frequently asked questions
How to germinate Canna seeds faster?
To germinate Canna seeds faster, scarify them by gently filing a small groove into their hard outer shell to expose the white inner layer. Then, place the scarified seeds on a damp paper towel inside a sealed plastic bag and store them in a warm, dark place. This method can lead to germination in just 5 days.
How long does it take for Canna to germinate from seed?
With the recommended scarification and damp paper towel method, Canna seeds can germinate in as little as 5 days. Without scarification, germination can be much slower, potentially taking several weeks to a few months, or even longer, for the natural protective coating to break down.
What is the best way to germinate Canna seeds?
The best way to germinate Canna seeds for quick results is the paper towel method combined with scarification. This involves manually breaking the hard seed coat (scarification), then providing a consistently moist, warm, and dark environment (damp paper towel in a sealed bag). This approach significantly speeds up germination and allows you to easily identify viable sprouts for planting.
Do Canna seeds need to be soaked before planting?
While soaking Canna seeds can help soften their hard outer shell, it's often not as effective or fast as scarification. For the fastest germination, first scarify the seeds to create an opening, then use the damp paper towel method for rapid water absorption and germination. Soaking alone might take much longer for germination to occur.