How to Germinate Palm Tree Seeds Quickly: The Proven Method
Do you want to know how to germinate palm tree seeds quickly and effectively? Many amateur gardeners encounter very long germination times or repeated failures. The secret lies in a simple pre-treatment and incubation method that significantly speeds up the process, allowing your palm tree seeds to germinate in just a few weeks instead of several months.
This comprehensive guide, inspired by expert advice from the Bricocultivo channel, will accompany you through each step, from seed selection to transplanting young palm sprouts. You'll learn essential tricks, such as removing fruit pulp and pre-soaking the seeds, crucial for success. This method is versatile and works for many palm species, including the popular Canary Island Date Palm (Phoenix Canariensis), as well as Pindo, Washingtonia, Blue, Royal, Date, Cycas, Chilean, Mexican, Bottle, Areca, and Butia palms.
By following these instructions, you will not only achieve a high germination rate, estimated at around 90%, but you will also reduce the waiting time by approximately 3 to 4 weeks. Get ready to grow your own palm trees with confidence and ease!
Step 1Preparing Palm Seeds: The Secret to Accelerated Germination
The most important part of this method, and the key to accelerating germination by several weeks, is proper seed preparation. This involves two critical steps: removing the fruit pulp and a specific pre-soaking technique.
Remove Pulp or Husk
Carefully remove any residual pulp or outer casing from each palm seed; this is vital for successful germination.
- Process: Gently peel away the outer layer. For dried seeds, this might be easier as the pulp is brittle.
- Importance: Removing the pulp prevents mold and fungal growth, which can inhibit or stop germination. It also allows the seed to absorb water more efficiently.
- Selection: Use only intact, firm seeds. Discard any that appear wrinkled, damaged, or defective, as they are unlikely to germinate.
Pre-soaking for Rapid Hydration
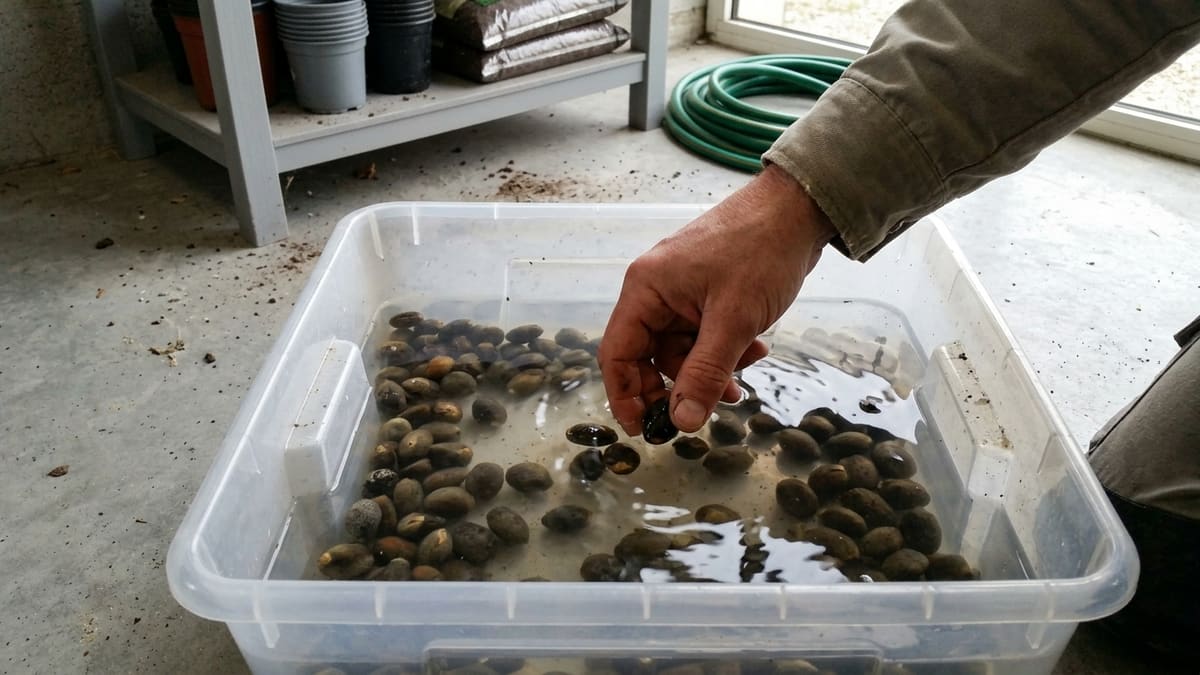
Soaking the cleaned seeds in water significantly improves hydration and triggers the germination process, saving you weeks of waiting.
- Container: Place your seeds in a glass or container filled with water. The amount of water should fully cover the seeds.
- Duration: Keep the seeds submerged for 4 days.
- Water Change: Change the water every 2 days to keep it fresh and prevent stagnation.
- Float Test: If any seeds float after 2 days, remove them and replace with new ones. Floating often indicates non-viable seeds.
Step 2The Paper Towel Incubation Trick: Optimal Conditions for Growth
After soaking, the next step is to create a perfect microclimate for your seeds to germinate using a simple paper towel and aluminum foil. This method maintains consistent humidity and darkness, mimicking ideal natural conditions.
Prepare the Paper Towel
Choose a durable paper towel or kitchen paper that won't disintegrate when wet; toilet paper is not suitable.
- Placement: Arrange your palm seeds in a single row on the paper towel.
- Orientation: For species like the Canary Island Date Palm, which have a distinct line or mark, place this mark facing upwards. The root will emerge from the opposite end.
Moisten and Seal
Ensure the paper towel is damp but not waterlogged to prevent fungal growth.
- Moistening: Submerge the paper towel with the seeds in clean water, then gently squeeze out excess. It should be moist but not dripping.
- Wrapping: Fold the paper towel over the seeds to enclose them completely.
- Sealing: Wrap the folded paper towel in a piece of aluminum foil. This creates an airtight and light-proof environment, essential for germination.
Incubation Period and Monitoring
Place your sealed packet in a warm location and monitor it weekly to maintain optimal conditions.
- Location: Choose a warm spot, such as a kitchen cupboard, which often stays at a constant temperature. Ideally between 25°C and 30°C (77°F to 86°F).
- Duration: Leave the seeds for approximately 14 days (2 weeks).
- Weekly Check: After one week, open the aluminum foil and check the paper towel. If it's starting to dry, re-moisten as before and reseal.
- Results: You should observe significant root growth after about two weeks, indicating successful germination.
Step 3Transplanting Young Palm Sprouts for Continued Growth
Once your palm seeds have successfully germinated and developed roots, it's time to transplant them into an appropriate pot to continue their growth. This step is crucial for establishing strong, healthy young palm plants.
Choose the Right Container
Palm trees, especially in their early stages, require deep containers to accommodate their developing root system.
- Recycled Bottles: An excellent option is to recycle a plastic bottle by cutting it in half or slightly above the middle. Ensure it is clean and has drainage holes at the bottom.
- Drainage: Punch several holes in the bottom of your chosen container to prevent waterlogging, which can lead to root rot.
- Depth: The deeper the container, the better for root development, allowing the palm to establish a strong base.
Select the Substrate
While palm trees are not overly demanding, a good quality universal potting soil will provide the best start for your seedlings.
- Universal Substrate: A standard universal substrate from any garden center is usually sufficient.
- Garden Soil: You can also use soil from your garden or vegetable patch if it is well-draining and rich in organic matter.
- Fertilization: While not strictly necessary at planting, begin fertilizing once the first true leaves start to emerge, typically after 3 to 4 weeks.
Plant the Germinated Seed
Handle the delicate sprout with care and ensure it is planted at the correct depth.
- Create the Hole: Use a pen or a small stick to make a hole wide and deep enough in the center of your prepared pot.
- Position the Seed: Place the germinated seed in the hole with the root pointing downwards. The seed itself should be about 1 cm (0.4 inches) below the surface.
- Firming: Gently press the soil around the seed to eliminate air pockets.
- Initial Watering: Water thoroughly after planting to settle the soil and provide initial moisture.
Step 4Care and Early Growth After Transplanting
After transplanting, your young palm plant will begin its slower, but steady, growth phase. Patience is key during this period, and consistent care will ensure its healthy development.
Initial Growth Timeline
Expect the first true leaves to emerge approximately 3 to 4 weeks after transplanting.
- Slow Start: The initial growth phase can be slow, as the plant prioritizes root development over visible foliage.
- Acceleration: As the palm grows, its development will gradually accelerate, producing new leaves more frequently.
- Root Development: The Canary Island Date Palm, in particular, first develops a robust downward root system before forming the stem and first leaf.
Watering and Fertilization
Regular watering and timely fertilization are essential for the palm's continued health.
- Watering: Keep the soil consistently moist but never waterlogged. Always ensure the container has good drainage.
- Fertilization: Start fertilizing your seedling with a suitable fertilizer once the first leaf appears. This provides the necessary nutrients for vigorous growth.
- Monitoring: Continuously observe your palm for any signs of stress or nutrient deficiency.
This process ensures your palm seedling has the best possible start, transitioning from a germinated seed to a robust young plant ready for eventual outdoor planting or larger pots.
💡 Expert Opinion: The Importance of Seed Pre-treatment
While many gardening guides mention scarification or cold stratification for stubborn seeds, the Bricocultivo method focuses on a less discussed but highly effective approach for palm seeds: fruit pulp removal and thorough pre-soaking in water for 4 days. This isn't just about hydration; it's about eliminating germination inhibitors present in the pulp and softening the hard seed coat. This strategic combination of pulp removal and sustained hydration, followed by warm, dark incubation in damp paper, provides an optimal environmental trigger, significantly boosting germination rates to an impressive 90% and shortening the typical waiting period from 2-3 months to just 2 weeks. This targeted pre-treatment offers a clear advantage over generic soaking advice found elsewhere.
Troubleshooting: Common Germination Issues
Even with the best techniques, challenges can arise when germinating palm seeds. Here are some common problems and how to effectively resolve them:
Seeds Don't Sink During Soaking
If seeds float after 2 days of soaking, they are likely non-viable and should be discarded.
- Action: Immediately remove any floating seeds when changing the water.
- Reason: Floating seeds often indicate they are empty, damaged, or unable to germinate.
Mold or Rot on Seeds/Paper Towel
Mold is usually a sign of excessive moisture or inadequate air circulation during the incubation period.
- Prevention: Ensure the paper towel is damp, not soaking wet, and wring out any excess water before wrapping in aluminum foil.
- Remedy: If mold appears, gently clean the affected seeds, re-moisten a fresh paper towel (ensuring appropriate moisture level), and re-wrap. Consider adding a small amount of fungicide to the water for stubborn cases.
- Ensure Cleanliness: Always start with clean seeds (pulp removed) and clean water during soaking.
No Germination After 2 Weeks
While the method is fast, some seeds may still take longer, or conditions might not be perfectly met.
- Patience: Some palm species naturally have longer germination times. Give them a few more weeks, up to 1-2 months.
- Warmth: Double-check that the incubation spot remains consistently warm. Below-ideal temperatures can significantly slow down germination.
- Moisture: Re-verify that the paper towel is still adequately moist but not waterlogged.
Addressing these common issues promptly will significantly improve your chances of successfully germinating your palm seeds. Remember, consistency in moisture and warmth, coupled with clean seeds, are your best allies.
Frequently asked questions
How long does it take for palm tree seeds to germinate with this quick trick?
With this accelerated method, palm tree seeds, especially varieties like the Canary Island Palm, can germinate in approximately 2 weeks. This is significantly faster than traditional methods, which can take 2 to 3 months.
What is the secret to speeding up palm tree seed germination?
The main trick involves two key steps: first, meticulously removing all fruit pulp from the seeds, and then, pre-soaking the cleaned seeds in water for 4 days, changing the water every 2 days. This pre-treatment hydrates the seeds and removes germination inhibitors, followed by incubation in a damp paper towel wrapped in aluminum foil in a warm, dark place for 14 days.
What materials do I need to germinate palm tree seeds with this method?
You will need palm tree seeds (cleaned), a glass or container for soaking, fresh water, durable paper towels (not toilet paper), aluminum foil, and a warm, dark place for incubation. For transplanting, a deep container (like a cut plastic bottle with drainage holes) and universal potting soil are essential.
Can this method be used for all types of palm tree seeds?
Yes, the Bricocultivo channel indicates that this method is highly versatile and effective for almost all palm species. Examples include the Canary Island Palm (Phoenix Canariensis), Pindo, Washingtonia, Blue, Royal, Date, Cycas, Chilean, Mexican, Bottle, Areca, and Butia palms.
How deep should I plant germinated palm tree seeds when transplanting?
When transplanting germinated palm tree seeds into a pot, ensure the seed is covered with approximately 1 cm (0.4 inches) of soil. It is crucial to use a deep pot to allow for extensive root development.
When should I start fertilizing my young palm tree sprouts?
Start fertilizing your palm sprouts once the first true leaf begins to emerge, which typically occurs 3 to 4 weeks after transplanting. This provides essential nutrients for healthy growth.