How to Germinate Stone Pine Seeds: Quick and Simple Guide
To successfully germinate your stone pine seeds (Pinus pinea), follow a simple, accelerated method that can produce sprouts in just two weeks. This process involves rigorous seed selection, strategic shell preparation, and proper hydration before sowing. You'll need basic tools like pliers, a soaking container, an airtight container, and paper towels for the germination phase.
- Seed Selection: Use only seeds that produce a slight rattling sound when shaken, indicating they are full and viable.
- Shell Preparation: Carefully clip the pointed end of the shell to expose the seed without damaging it.
- Soaking: Hydrate the prepared seeds in water for 24 hours; discard any that float.
- Germination: Place seeds between moist paper towels in a sealed container, away from light, for 2 weeks, checking moisture weekly.
- Planting: Once germinated, plant the young sprouts in a pot filled with organic-rich potting soil, burying the root and 1 to 2 cm of the stem.
This method significantly speeds up the germination process, allowing you to grow your own stone pines much faster than traditional methods, which can take several weeks longer. Adequate watering and direct sunlight exposure are essential for young seedlings after planting.
⚠️ Important Note: While this guide helps you germinate stone pine seeds, remember that growing trees from seed can take many years to reach maturity. Patience is key, as initial growth is slow but accelerates over time.
📌 Quick Summary:
- Difficulty: Easy
- Germination Time: Approximately 2 weeks (may vary)
- Key Steps: Seed selection, shell notching, 24h soaking, paper towel method in darkness.
- After Germination: Plant in organic-rich potting soil, full sun exposure, keep soil moist.
1. The ideal time to germinate your stone pine seeds
If you're wondering what the ideal time is to start germinating your stone pine seeds, the good news is that the accelerated method described here, inspired by Bricocultivo, allows you to start year-round. As the process takes place indoors, seasonal constraints are greatly reduced. However, if you plan to plant your young sprouts outdoors, spring or early summer are optimal periods. Mild temperatures and increased natural light will promote better adaptation of your seedlings to the new environment. The key is to provide them with constant warmth (around 20-25°C) and a stable environment, conditions easily replicated at home, regardless of the season.
2. Selecting the best stone pine seeds for successful sowing
To ensure a high success rate when you want to germinate stone pine seeds, start by carefully selecting viable seeds. This initial step is simple but crucial.
Harvest your pine nuts or buy your seeds
Collect stone pine nuts (also known as pine kernels) directly from mature cones.
- These seeds are typically found inside the cones and are the reproductive units of the Pinus pinea tree.
- You can also purchase them from a reputable seed supplier, ensuring the freshness of the seeds.
Perform the rattle test
Hold each pine nut individually between your fingers and shake it gently.
- Listen for a slight rattle from inside the shell.
- This sound indicates the presence of a developed embryo, making the seed a viable candidate for germination.
- This simple test helps you to optimize your success rate.
Discard empty seeds
If a seed makes no sound when shaken, it is likely that the kernel inside is underdeveloped or hollow.
- These seeds are not viable and will not germinate.
- Eliminate them to focus your efforts on healthy seeds and maximize your chances of success.
3. Preparing pine seeds for accelerated germination
To significantly accelerate the germination process and get results in a few weeks, proper seed preparation is essential. This method, illustrated by Bricocultivo, focuses on scarification and hydration.
Notch the end of the seed
Using a pair of pliers (or sturdy nail clippers), carefully snip the pointed end of each pine nut.
- Be extremely careful to remove only the outer shell and avoid damaging the inner seed.
- This small opening allows water to penetrate the seed more easily, which is key for faster germination.
- This is a form of mechanical scarification that helps break dormancy.
Soak the prepared seeds
Place all notched seeds in a glass of clean water.
- Let them soak for exactly 24 hours.
- This step hydrates the seed, breaking its dormancy and preparing it for active growth.
- Soaking is a form of hydration stratification.
Discard floating seeds after soaking
After 24 hours, observe the seeds in the water.
- Any seeds that are still floating indicate that they are hollow or non-viable.
- Remove and discard them, as they will not germinate.
- This ensures you proceed only with the healthiest seeds for a high success rate.
4. Materials and tools needed to germinate your seeds
To successfully complete your stone pine germination project, you won't need complex equipment. Here is a list of essential materials and tools for each step:
- For seed preparation:
- Stone pine seeds (pine nuts), fresh and selected.
- Pliers or sturdy nail clippers to notch the end of the seeds.
- A glass or small bowl filled with clean water for soaking.
- For the germination phase (paper towel method):
- An airtight container with a lid (e.g., plastic food container) to create a humid, dark environment.
- Good quality, unscented paper towels.
- Water to moisten the paper towels.
- For planting young sprouts:
- Small pots or a seed tray with drainage holes.
- Seedling compost or a rich, light, well-draining organic matter mix. A peat, perlite, and vermiculite mix is ideal.
- A thin stick, pencil, or chopstick to make planting holes.
- A spray bottle for delicate initial watering.
With these simple materials, you are ready to start growing your stone pines!
5. The paper towel method for germination: precise steps
Once your stone pine seeds are selected and prepared, the next step is to create an optimal environment for germination. The paper towel method, carried out in a dark and humid container, provides ideal conditions for the seeds to sprout. This is the accelerated method that allows you to see results in just two weeks!
Prepare the container base
Take a clean, airtight container with a lid (a plastic food container works perfectly).
- Carefully moisten several sheets of paper towel with water, then gently wring them out to remove any excess.
- Place this layer of moist paper towel at the bottom of your container, ensuring it covers the entire base.
- This layer will provide the necessary moisture.
Arrange the seeds
Gently place your soaked pine seeds on the moist paper towel.
- Arrange them in an organized manner, ensuring they are spaced out and do not touch each other directly.
- This prevents mold and gives each seed optimal space for root development.
- Leave a space of about 2-3 cm between each seed.
Cover and seal
Take another sheet of paper towel, moisten it slightly (less than the base layer), wring out excess water, and gently place it over the seeds.
- Seal the container tightly with its lid.
- This creates a mini-greenhouse effect, trapping moisture and providing the dark environment pine seeds need to germinate.
Store in darkness and monitor
Keep the sealed container in a dark place, such as a cupboard or drawer.
- The ideal ambient temperature for germination is between 20°C and 25°C.
- Check the seeds once a week for moisture levels; if the paper towel starts to dry, re-moisten it slightly with a spray bottle.
- You should see roots emerging in approximately 5 to 15 days, although this may vary slightly depending on temperature and seed quality.
- The first green shoots may appear a little later.
6. Environmental factors for successful germination
To successfully germinate your stone pine seeds, it is crucial to master certain environmental factors. Each stage of germination has its own requirements:
- Light:
- During germination (paper towel method): Total darkness is essential. Pine seeds do not need light to germinate, and premature exposure can even inhibit the process. A closed container in a cupboard or drawer is therefore ideal.
- After planting: Once the seedlings have emerged from the soil and the first needles appear, they need intense, direct light. Place your pots in a location receiving maximum sun (6 to 8 hours a day). A south-facing window is perfect indoors.
- Temperature:
- During germination: A stable and moderate temperature is optimal. Keep the container between 20°C and 25°C (68°F and 77°F). Too low temperatures will significantly slow down germination, while too high temperatures can promote mold growth.
- After planting: Young sprouts appreciate a similar ambient temperature. If you place them outdoors, make sure the risk of late frosts has passed.
- Humidity:
- During germination: Constant and high humidity is vital. The paper towel should always be moist, but not soaking wet. Excess water can lead to seed rot. The airtight container helps maintain this humidity. Check moisture weekly and spray a little water if necessary.
- After planting: The potting soil should be kept uniformly moist, especially during the first few weeks. Allow the soil surface to dry slightly between waterings to avoid waterlogging, but never let the substrate dry out completely.
Respecting these conditions will significantly increase your chances of successfully seeing your stone pine seeds thrive.
7. Signs of successful germination and how to identify problems
It is important to know how to recognize the signs of successful germination and, conversely, indicators of potential problems. This regular observation will allow you to intervene quickly and optimize the survival rate of your young stone pine sprouts.
Signs of successful germination:
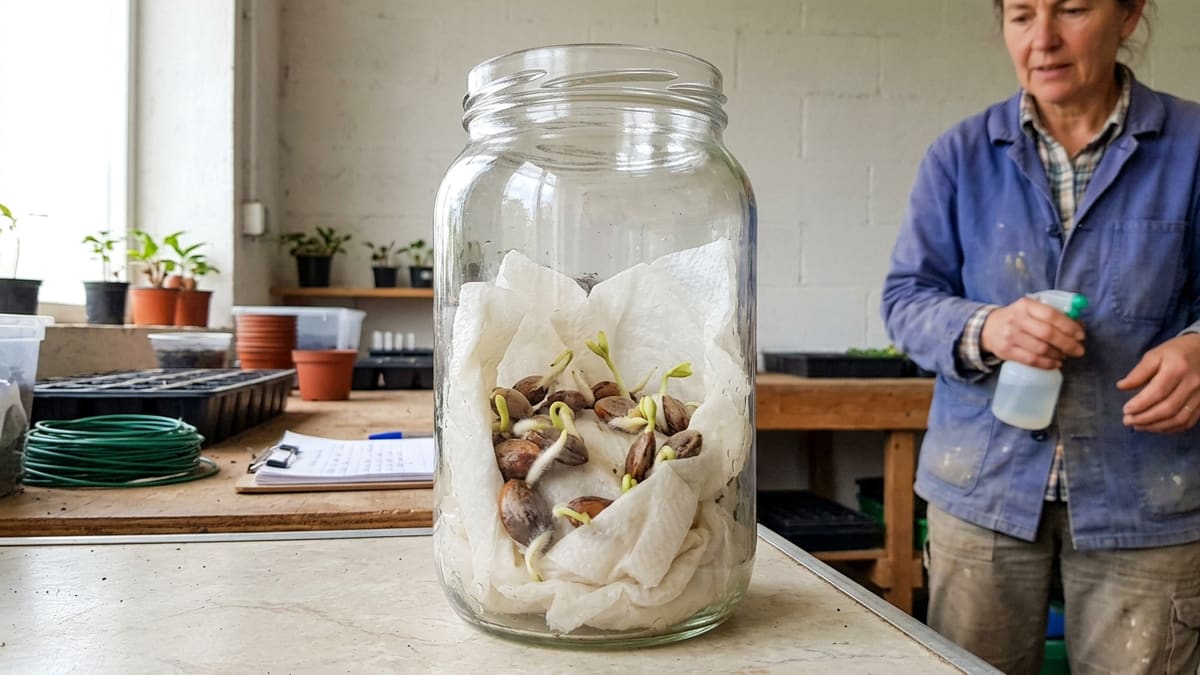
- Root emergence: The first visible and most exciting sign is the appearance of small white roots, called radicles, emerging from the notched end of the seed. They usually measure a few millimeters to 1 cm long. This can occur between 5 and 15 days after the start of germination.
- Appearance of green shoots: Soon after root emergence, you will see small green shoots, composed of the first needles (cotyledons), which gradually straighten up. The seed shell is often lifted by the shoot before falling off naturally.
- Straight, robust stems: Healthy young seedlings will have firm, vibrant green stems and will stand upright.
Signs of problems:
- Floating seeds after soaking: If seeds are still floating after 24 hours of soaking, it's a sign that they are hollow or non-viable. It is best to discard them.
- No germination after 3 weeks: If no roots have appeared after 3 weeks, it is likely that the seeds are not viable or that germination conditions are not optimal (temperature, humidity).
- Presence of mold: Paper towels or seeds can develop mold if the environment is too humid or poorly aerated. Mold appears as fuzzy white or gray patches. In this case, immediately remove affected seeds, clean the container, and replace the paper towel. Make sure to wring out the paper towel more to reduce excess moisture.
- Softened or blackened seeds: A seed that becomes soft, slimy, or black indicates rot. This is often due to excess moisture or pathogens.
- Leggy or weak seedlings: After planting, if young shoots are very thin, pale, and seem to stretch excessively towards the light, this is a sign of insufficient light. They should be moved to a brighter location.
By paying attention to these signals, you will maximize your chances of successfully germinating stone pine seeds and raising robust seedlings.
8. Transplanting your young pine sprouts
Once your stone pine seeds have successfully germinated and developed visible roots and shoots, it's time to gently transplant them into the soil to continue their growth journey.
Prepare the potting mix
Choose a pot or seedling tray filled with good quality potting soil.
- Although pines are not excessively demanding, an organic-rich, light, and well-draining potting mix will promote faster and healthier development.
- A special seedling mix or an equal parts mix of universal potting soil, perlite, and vermiculite is excellent.
- Make sure the pot has drainage holes to prevent waterlogging.
Create planting holes
Using a stick, pencil, or similar tool, make a small hole in the center of the potting soil.
- The hole should be deep enough to accommodate the young sprout's root system and the lower part of its stem.
- Be careful not to make too narrow a hole that would compress the roots.
Plant the young sprout
Gently place a germinated pine sprout into the hole.
- Make sure the entire root system is covered and that at least 1 to 2 centimeters of the stem are buried.
- Lightly tamp the potting soil around the young sprout to eliminate air pockets, but do not compress too much.
- Leave the outer seed shell intact on the young sprout; it will fall off naturally in a few days as the sprout straightens.
Initial watering and placement
Immediately after planting, water the young sprout thoroughly until water drains from the bottom of the pot.
- Place the pot in a location receiving full sun (ideally 6 to 8 hours a day), as pines thrive in bright conditions.
- Monitor soil moisture daily and water as soon as the top layer of the substrate begins to dry to prevent the young sprout from drying out.
- Maintain a stable ambient temperature, ideally between 18°C and 25°C.
9. Care and growth of your young stone pine sprouts
After successfully planting your young pine sprouts, understanding their growth pattern and providing appropriate care will ensure their healthy development into mature trees. This is where your patience will be rewarded!
Ongoing care for seedling survival:
- Watering: Young pines need constant moisture. The potting soil should remain moist but never waterlogged. Water when the top 2 to 3 centimeters of the soil surface are dry to the touch. Excess water can cause root rot, while a lack of water can dry out the young sprout.
- Light: Continue to provide maximum sunlight. Stone pines are Mediterranean trees that love light. If natural light is insufficient (especially in winter), supplemental grow lights may be beneficial.
- Temperature: Maintain a stable and mild temperature. Protect young sprouts from frost if you have placed them outdoors.
- Fertilization: Young seedlings generally do not need fertilizer for the first few weeks. After 2-3 months, you can consider a balanced liquid fertilizer, diluted by half, once a month, especially if the potting soil is not very rich.
- Protection: Monitor young sprouts for potential pests or diseases, although pines are generally quite resistant. Ensure they are not too crowded to promote good air circulation.
How long does it take to see the first shoots and growth?
As mentioned earlier, thanks to the accelerated method, you should see the first roots in 5 to 15 days, quickly followed by green shoots. However, pines, including Pinus pinea, are known for their slow initial growth. For the first few years, your young sprouts will primarily develop their roots and establish themselves, often growing only a few centimeters per year. The Bricocultivo video shows a young sprout reaching approximately 20-25 centimeters (8-10 inches) in height after 8 months. This slow start is normal and requires patience.
As they mature and become more established, pines will begin to grow more quickly. A healthy stone pine can eventually reach heights of over 20 meters (65 feet) and live for more than 300 years. Continuous monitoring of soil moisture remains essential for young pines; they prefer consistent conditions, but not waterlogged. Ensure they continue to receive full sun as they grow.
🏆 Expert Verdict: Tips for Success
For more detailed information on forest seed germination, consult specialized nursery resources or agricultural research websites. You can find comprehensive guides on propagating various tree species on the FAO Forestry website, a recognized authoritative source.
Frequently asked questions
What is the ideal time to start germinating stone pine seeds?
The accelerated method (scarification, soaking, and germination on paper towels) can be performed indoors year-round, allowing you to start whenever you wish. If you plan to transplant them outdoors, spring or early summer are optimal periods for better seedling adaptation.
Should seeds be prepared before sowing (stratification, soaking, etc.) and how?
Yes, seed preparation is crucial for accelerated germination. Start by selecting viable seeds using the 'rattle test'. Then, gently notch the pointed end of each seed's shell with pliers to facilitate water absorption. Finally, soak the notched seeds in water for 24 hours to rehydrate them and break their dormancy.
What materials and tools are needed for germination?
You will need: stone pine seeds, pliers, a glass of water for soaking, an airtight container with a lid, paper towels, and water for the germination phase. For transplanting, plan for small pots with drainage, organic-rich seedling compost, a stick for making holes, and a spray bottle for watering.
What are the precise and detailed steps for sowing seeds and promoting germination?
After preparing your seeds (notched and soaked), arrange them on a layer of moist paper towel at the bottom of an airtight container. Cover with another slightly moist paper towel. Seal the container and place it in a dark spot, at a stable room temperature of 20-25°C. Check the paper towel's moisture weekly. The first roots should appear in 5 to 15 days.
What environmental factors (light, temperature, humidity) must be respected for successful germination?
During germination in the container, total darkness and constant high humidity (moist but not waterlogged paper towel) are critical, with an ideal temperature between 20°C and 25°C. After planting, young sprouts require full sun (6-8 hours/day), uniformly moist but well-drained potting soil, and a mild ambient temperature (18-25°C).
How to care for young sprouts after germination to ensure their survival?
After planting, keep the potting soil moist but not waterlogged by watering when the top 2-3 centimeters of the surface are dry. Provide maximum sunlight (6 to 8 hours per day). Maintain a stable temperature and protect them from frost. Light fertilization with a diluted fertilizer can be considered after 2-3 months.
What are the signs of successful germination and those of a problem?
Successful germination is indicated by the appearance of white roots (radicles) in 5 to 15 days, followed by green shoots with the first needles. Signs of problems include seeds that float after soaking (non-viable), no germination after 3 weeks, presence of mold (excess moisture), softened/blackened seeds (rot), or leggy seedlings (lack of light).
How long does it take to see the first sprouts?
With the accelerated notching and soaking method, you can expect to see the first roots emerge from the seeds in just 5 to 15 days. The first green shoots and cotyledons will follow shortly thereafter. Initial growth will then be slow, reaching about 20-25 cm in 8 months.